
Get ready to transform classrooms into winter wonderlands with our delightful Christmas craft ideas tailored for school settings. From adorable handmade ornaments to festive classroom decorations, we've curated a list of projects that will not only bring joy to your students but also ignite the spirit of the season. Dive into the enchanting world of Christmas crafts, where learning and festive fun collide!
Christmas Hearts
You will need -
- Red Felt
- Tapestry Needles
- Embroidery Yarn
- Scissors Tube
- Toy Filling

Instructions -
1. Fold a piece of red felt in half and cut out a heart out of both of the layers.
2. Use white yarn to do a blanket stitch round the edges of the two hearts. Leave a small gap to stuff with filling.
3. Using single stitches create a pattern of stars or snowflakes.
4. Fill the inside of the heart with toy filling.
5. Sew up the remainder of the outside of the heart to contain the filling.
6. Sew a loop at the top of the heart to turn this into a hanging decoration.
Don't forget to follow us @KCSSocial for more creative crafting ideas!
Spotty Dotty Christmas Tree
You will need -
- Scissors
- Glue
- Felt
- Ribbon
- Hole Punch
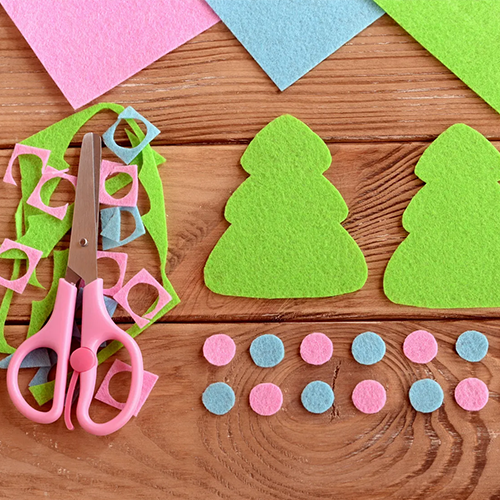
Instructions -
1. Take a piece of green felt and fold it in half.
2. Cut out a Christmas tree shape out of both layers of felt. It will create two seperate Christmas trees.
3. Take two different coloured pieces of felt and cut out small circles which will be the baubles for the Christmas tree.
4. Using scissors, carefully cut from the top of one of the Christmas trees down the centre to the middle.
5. Then use the scissors to carefully cut the other Christmas tree, this time starting at the bottom and cutting up to the centre of the tree.
6. Slot the two Christmas trees together to create a 3D tree.
7. Use glue to stick the felt baubles onto the tree.
8. Punch a hole into the top of the Christmas tree.
9. Thread ribbon through the hole and create a loop to hang the tree from.
Sock Snowmen
You will need -
- (Clean) Socks
- Ribbon
- Buttons
- Sand
- Beads
- Scissors
- String
- Glue

Instructions -
1. Fill a sock with sand and tie the end tightly using string.
2. At a third of the way down the sock tie some more string around it tightly to create a head and a body for the snowman.
3. Use glue to attach buttons to the front of the snowman going vertically up the body.
4. Then use a selection of buttons and beads to create the face of the snowman.
5. Use a thin strip of coloured ribbon or materials to create a scarf and glue this around the neck of the snowman.
6. Cut an oval from fabric and fold it in half using glue to seal the two side edges to create a hat. Then glue this onto the head of the snowman.
Twisty Trees
You will need -
- Cones
- Cotton Threads
- Cornstarch/Glue
- Cling Film
- Water
- Flitter
- Bowl

Instructions -
1. Mix up a thin liquid consisting of either corn starch and water or glue and water (the latter will be more sticky).
2. Take the cone and wrap it in a few layers of cling film.
3. Starting at the top of the cone begin tightly wrapping green cotton around the cone working in a downwards spiral, leaving gaps so the cone is not completly covered.
4. Next, take some white cotton and starting at the top again begin to tightly wrap it around the cone all the way to the bottom, doing this more sparadically than the green.
5. Now use a paintbrush to brush a thick layer of the glue/cornstartch mixture over threads.
6. Leave this to dry.
7. Once dry, apply another layer of the mixture over the threads to strengthen them.
8. Leave this to dry.
9. Carefully pull out the cone and cling film from the centre of the tree.
10. Tab glue onto the tree and sprinkle with glitter to decorate.